Post by Maguffin on Sept 12, 2005 22:26:25 GMT -5
Beginning note: If I need to change the size of my pictures anymore -or at least, with a few of them- please just tell me, and I'll change them to links, because they need to be decently viewable.
Also: Ignore the boxes when there, my screencap program leaves an annoying stamp on images.
I know there's a similar thread, but this one's made by me, and hopefully, you'll be able to get a better grasp on where things such as 'the pen tool,' it's functions and how it should be used (instead of having to figure it out) will be explained.
I'm going to use a picture I drew the other day in Photoshop and Illustrator class (haha, go figure >.>0) and draw this as I go.
Another good tutorial for this sort of thing would be by:
Kuro- www.ear-tweak.com/ramblings/jouka_01.htm
and Druihd (I understood the Pen tool concept better in Druihd's tutorial, that and I had heard about the Pen tool during photoshop in class that day e.e0)- druihd.staze.org/new.html
Ok, so first I'm going to explain the tool, and how to use it. Otherwise, you're going to end up getting scared because of not clicking the correct stuff. Now, I'm using Adobe Photoshop 7, so things may very depending on the version you're using.
__________________________
Ok, so Basic of Basics, and what I'm using.
I have a Wacom tablet, so, some may feel I have an advantage there- all except for the fact that I can't do proper lines with it.. Thus, if you look at my DeviantArt gallery, and look at my Easter picture for 2005, examine the bunny ears. They have wavy lines.
This is because for some reason my tablet hates me XD So.. after months of artist frustration, I stumbled into photoshop class, and vuala! Learned how to use the pen tool, that was then furthered by Druihd's tutorial. =3
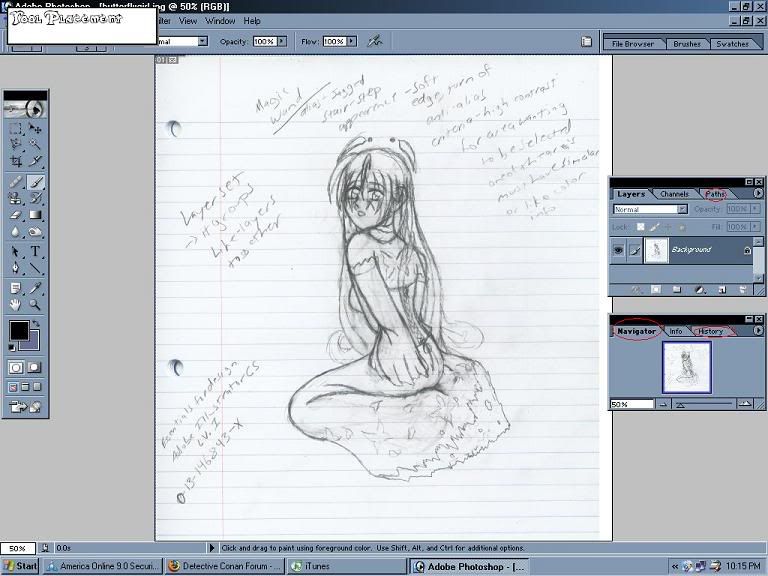
So.. step one: The obvious. Scan in your already drawn picture. Now, with your sketches, I would suggest you get tracins paper if you tend to be 'messy' and make a clean copy, so you have a better idea of what you were originally going for with the lines/placement.
With the pen tool, a tablet it unnecessary, and thus, only a mouse is really needed for it.
I wasn't able to use my tracing paper for this picture because... it dissappeared on me X.x0 I couldn't locate my precious tracing paper.. so instead you have to deal with my Notebook copy....
....With photoshop notes on it XD And...the book I need for Illustrator.
Ignore it XD
Starting out Suggestions: It's a good thing to have your History out. Now, I moved my History out from it's seperate window, and put it in my Navigator. I find it easier this way, and it saves space on your screen. I'm working with a PC so.. space ish good.
To use the pen tool, you'll also need the Paths window. This should be in your layer window already, but if not, put it there.
Now.. I'm going to use a different picture, simply because I discovered just after making the first step, I didn't like the picture I chose. (Argh)
Alright.
With your outline, to change the color, go to your brush tool, and change its setting from 'Normal' to 'Screen' and choose a color (blue is preferable, and it would be good to make it a medium or dark color, since screen willl lighten it). Go over your pencil and then you can go over the lines without confusion.
CAUTION: Do NOT forget to change the brush tool back to 'Normal' immediately. If you don't, you'll hate yourself XD
Side special note: If and when you scan something in, and it's not on the correct angle you wanted it on (as is what happened with my picture), simply go to 'Edit > Transform > Rotate. Move your mouse to the outer corner, and you should get a bendy arrow. After that you simply drag, and once you get it on the correct angle you want, hit enter.

Now you can add Layers (go to Layer > Add Layer), which nowadays, I ussually start out with adding 10. -shrugs-
Layer 10 will be my line layer (though I don't take the time to rename. If I have to go back a layer, I ussually with click it off to see what's on the layer).
Pen Tool: It's good to enlarge your image outside of Photoshop, and when finished, re-size it back to the size you'd perfer, so that you can use size 3 for your brush size without the lines becomming to thick. I'm still going to end up using size 1 or 2 though, since I'm not having luck =.=0
While using the pen tool, watch your layers. Make sure you're on the right layer before using it. Click on Paths, and the pen tool.
IMPORTANT: The size of your path is dependant on your brush's size, so PLEASE make sure to have that set BEFORE using the tool, or you'll scare yourself. Don't worry: It's easily fixed by changing the size, and hitting the line path tool again.
When 'Stroking a path' (filling it in, instead of it being just the tool line) you need to click on your brush too, and then hit the stroke line path tool (I don't know the actual name X.x0 will be on picture). You'll go back and forth between these 2 options repeatedly. Also, to get curved lines, you ned to make the beginning and end to your path, go back to the pen too, right click, and his the pen + button. This will add an anchor, and you can then move it, sort of like a bezier tool. When continuing the path, you need to right click, and go pack to the normal tool. After that, you hit the last path mark to continue (I hope that makes sense...).
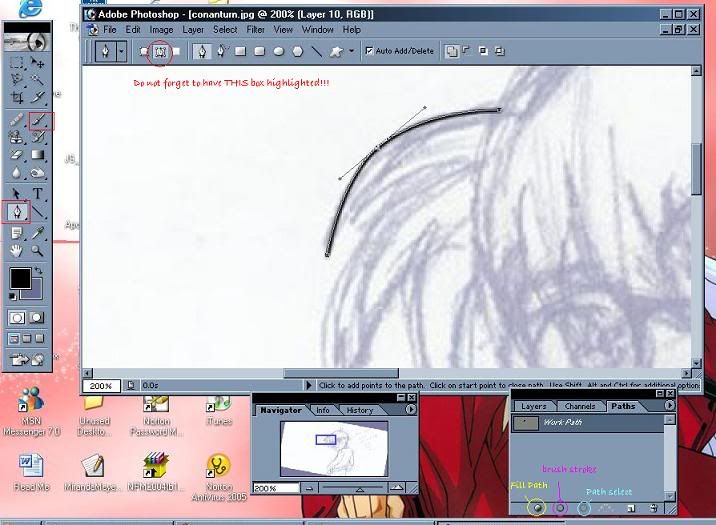
When finished with a path, and after stroking it, all you need to do is 'Delete Path' (Right click) and the path will dissappear, leaving you to start a new one.
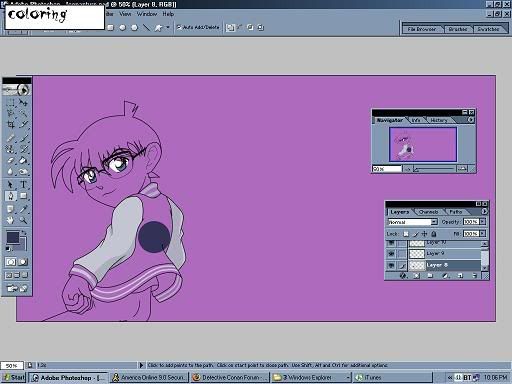
When finished lining, color over your background layer with a darker color, so that when you color your picture, you can see if your inner coloring has gotten outside of the lines.
After this, I ussually go to the second layer after my line layer, and I go and fill in the eyes. I do this simply to get them out of the way, and so that when I color in the skin, I don't have to worry about running into/over the coloring job.
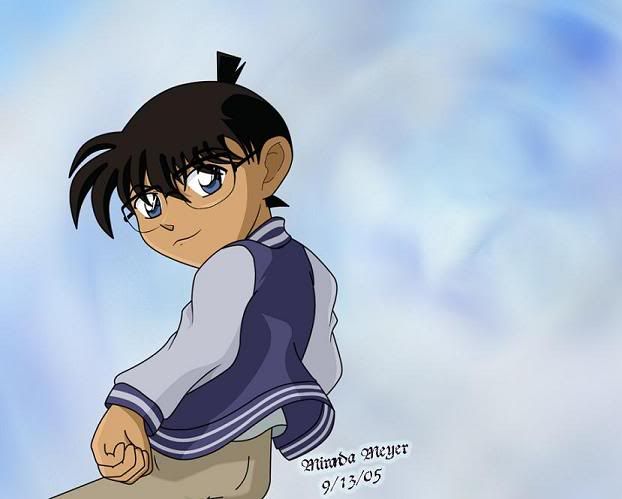
So, after that I filled in the sleeves/lines in Conan's jacket. Now, It's ussually recommended to do your shading on seperate layers. I personally don't, so I keep one group color on the same layer.
I also put in what color I'm using on the jacket on L8.
Another note on coloring/shading: You should put either an arrow or dot where your light source is. For this picture, I have a source though (a picture of Daisuke/Davis from Digimon Adventure 02).
And this is my finished piece, once I finished coloring. =3
As for the background, I looked around for whispy tutorials.. and didn't find any XD So.. I simply played around with another tutorial on how to make an ocean, and ditched it halfway through. e.e0
Basically, what I did for the B/g was put in a light blue foreground color, put in an x of a lighter blue with randomely opaced lines. After that I went to Filter> Render >Clouds (I THINK, just look around the filter tools to find it if it's not there XD blaah~). After that I changed the contrast of the clouds, auto colored it.. and somply played with it.
Following, I went to Filter> Waves (?) and played around there 'till I felt it was interesting enough. Then, I went to filter> Radial blur and went to my heart's content on the blur there.
I then went to a higher up layer that was empty, took the star/cross hatch?? tool, made it super large, and went around the picture with it. After I went to Filter> Distort> Add Noise (I think that's where it is, remember, I'm not looking, and I'm simply trying to remember what I did). I then used Filter> Gaussian blur.
(Hope the b/g made sense, really, all it is, is playing around with your tools.)
This ends my tutorial. If you want more, look at the two I supplied at the beginning, or if you need something explained, don't fret about asking. =3
Also: Ignore the boxes when there, my screencap program leaves an annoying stamp on images.
I know there's a similar thread, but this one's made by me, and hopefully, you'll be able to get a better grasp on where things such as 'the pen tool,' it's functions and how it should be used (instead of having to figure it out) will be explained.
I'm going to use a picture I drew the other day in Photoshop and Illustrator class (haha, go figure >.>0) and draw this as I go.
Another good tutorial for this sort of thing would be by:
Kuro- www.ear-tweak.com/ramblings/jouka_01.htm
and Druihd (I understood the Pen tool concept better in Druihd's tutorial, that and I had heard about the Pen tool during photoshop in class that day e.e0)- druihd.staze.org/new.html
Ok, so first I'm going to explain the tool, and how to use it. Otherwise, you're going to end up getting scared because of not clicking the correct stuff. Now, I'm using Adobe Photoshop 7, so things may very depending on the version you're using.
__________________________
Ok, so Basic of Basics, and what I'm using.
I have a Wacom tablet, so, some may feel I have an advantage there- all except for the fact that I can't do proper lines with it.. Thus, if you look at my DeviantArt gallery, and look at my Easter picture for 2005, examine the bunny ears. They have wavy lines.
This is because for some reason my tablet hates me XD So.. after months of artist frustration, I stumbled into photoshop class, and vuala! Learned how to use the pen tool, that was then furthered by Druihd's tutorial. =3
So.. step one: The obvious. Scan in your already drawn picture. Now, with your sketches, I would suggest you get tracins paper if you tend to be 'messy' and make a clean copy, so you have a better idea of what you were originally going for with the lines/placement.
With the pen tool, a tablet it unnecessary, and thus, only a mouse is really needed for it.
I wasn't able to use my tracing paper for this picture because... it dissappeared on me X.x0 I couldn't locate my precious tracing paper.. so instead you have to deal with my Notebook copy....
....With photoshop notes on it XD And...the book I need for Illustrator.
Ignore it XD
Starting out Suggestions: It's a good thing to have your History out. Now, I moved my History out from it's seperate window, and put it in my Navigator. I find it easier this way, and it saves space on your screen. I'm working with a PC so.. space ish good.
To use the pen tool, you'll also need the Paths window. This should be in your layer window already, but if not, put it there.
Now.. I'm going to use a different picture, simply because I discovered just after making the first step, I didn't like the picture I chose. (Argh)
Alright.
With your outline, to change the color, go to your brush tool, and change its setting from 'Normal' to 'Screen' and choose a color (blue is preferable, and it would be good to make it a medium or dark color, since screen willl lighten it). Go over your pencil and then you can go over the lines without confusion.
CAUTION: Do NOT forget to change the brush tool back to 'Normal' immediately. If you don't, you'll hate yourself XD
Side special note: If and when you scan something in, and it's not on the correct angle you wanted it on (as is what happened with my picture), simply go to 'Edit > Transform > Rotate. Move your mouse to the outer corner, and you should get a bendy arrow. After that you simply drag, and once you get it on the correct angle you want, hit enter.
Now you can add Layers (go to Layer > Add Layer), which nowadays, I ussually start out with adding 10. -shrugs-
Layer 10 will be my line layer (though I don't take the time to rename. If I have to go back a layer, I ussually with click it off to see what's on the layer).
Pen Tool: It's good to enlarge your image outside of Photoshop, and when finished, re-size it back to the size you'd perfer, so that you can use size 3 for your brush size without the lines becomming to thick. I'm still going to end up using size 1 or 2 though, since I'm not having luck =.=0
While using the pen tool, watch your layers. Make sure you're on the right layer before using it. Click on Paths, and the pen tool.
IMPORTANT: The size of your path is dependant on your brush's size, so PLEASE make sure to have that set BEFORE using the tool, or you'll scare yourself. Don't worry: It's easily fixed by changing the size, and hitting the line path tool again.
When 'Stroking a path' (filling it in, instead of it being just the tool line) you need to click on your brush too, and then hit the stroke line path tool (I don't know the actual name X.x0 will be on picture). You'll go back and forth between these 2 options repeatedly. Also, to get curved lines, you ned to make the beginning and end to your path, go back to the pen too, right click, and his the pen + button. This will add an anchor, and you can then move it, sort of like a bezier tool. When continuing the path, you need to right click, and go pack to the normal tool. After that, you hit the last path mark to continue (I hope that makes sense...).
When finished with a path, and after stroking it, all you need to do is 'Delete Path' (Right click) and the path will dissappear, leaving you to start a new one.
When finished lining, color over your background layer with a darker color, so that when you color your picture, you can see if your inner coloring has gotten outside of the lines.
After this, I ussually go to the second layer after my line layer, and I go and fill in the eyes. I do this simply to get them out of the way, and so that when I color in the skin, I don't have to worry about running into/over the coloring job.
So, after that I filled in the sleeves/lines in Conan's jacket. Now, It's ussually recommended to do your shading on seperate layers. I personally don't, so I keep one group color on the same layer.
I also put in what color I'm using on the jacket on L8.
Another note on coloring/shading: You should put either an arrow or dot where your light source is. For this picture, I have a source though (a picture of Daisuke/Davis from Digimon Adventure 02).
And this is my finished piece, once I finished coloring. =3
As for the background, I looked around for whispy tutorials.. and didn't find any XD So.. I simply played around with another tutorial on how to make an ocean, and ditched it halfway through. e.e0
Basically, what I did for the B/g was put in a light blue foreground color, put in an x of a lighter blue with randomely opaced lines. After that I went to Filter> Render >Clouds (I THINK, just look around the filter tools to find it if it's not there XD blaah~). After that I changed the contrast of the clouds, auto colored it.. and somply played with it.
Following, I went to Filter> Waves (?) and played around there 'till I felt it was interesting enough. Then, I went to filter> Radial blur and went to my heart's content on the blur there.
I then went to a higher up layer that was empty, took the star/cross hatch?? tool, made it super large, and went around the picture with it. After I went to Filter> Distort> Add Noise (I think that's where it is, remember, I'm not looking, and I'm simply trying to remember what I did). I then used Filter> Gaussian blur.
(Hope the b/g made sense, really, all it is, is playing around with your tools.)
This ends my tutorial. If you want more, look at the two I supplied at the beginning, or if you need something explained, don't fret about asking. =3