
Post by vuvu •°♡ on Jul 3, 2005 1:14:34 GMT -5
This was requested by Kyubinaruto, for this picture:

But of course, VuVu-chan wasn't smart enough to save her PSD file, so she doesn't actually remember how she did it. But she'll try and recreate it to the best of her ability.
This tutorial assumes you know the basics of photoshop like creating new layers, merging, etc... ((though if you're unsure, you can ask me ^^))
Enough babbling. Here's the tutorial.
1. I'm going to use this base of Tifa ((you can use it to practice if you want)):
2. I don't really like the quality of the image, so lets tweak it abit.
Duplicate that base layer. Then go to Filter ---> Sharpen ---> Sharpen.
3. Now the it looks a bit too sharp, so let's duplicate that sharpened layer. Then set it to "Overlay"
4. Something is still wrong, so lets resort to my favourite technique. Create a new layer, fill it with a dark blue ((I used #0C0841)) Then put the opacity down to 50%
Your image should now look something like this:

5. I'm happy with the quality of my base picture now, so lets merge the layers together, and leave it alone.
Now to the actual icon-making:
6. Ok... So I don't remember exactly how I made that icon. But here's how the weave-like pattern was achieved:
Create a new layer
Go Edit ---> Fill ---> Select "Pattern" ---> "Texture Fill 2" ---> Weave 5.
7. Create a new layer, fill it with a gradient color of your choice ((I chose this ((it's a custom gradient made by a LJer, I'll put a link to it later)):
 ))
))
8. Put the gradient layer to "color"
9. Merge the Pattern and Gradient layer. ((Name it as "Base Pattern"))
10. Duplicate this layer, put it as "Multiply"
11. Duplicate this again, put it as "Screen", 50%
12. Merge all these pattern layers.
It should looks like this:
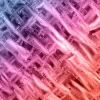
13. Set the merged layer to Screen. It should look like this:
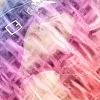
14. I'm sure no one wants to keep it that way. Using a soft, round rubber ((with 40% opacity)), clean off the area around her face.

K, I seriously do not know how I did the rest. I'm sorry. But it's just a bunch of warm colored gradients and a some text.
I promise my next tutorial will be better. *will remember to save the psd file*
Sorry guys *bow*
But of course, VuVu-chan wasn't smart enough to save her PSD file, so she doesn't actually remember how she did it. But she'll try and recreate it to the best of her ability.
This tutorial assumes you know the basics of photoshop like creating new layers, merging, etc... ((though if you're unsure, you can ask me ^^))
Enough babbling. Here's the tutorial.
1. I'm going to use this base of Tifa ((you can use it to practice if you want)):
2. I don't really like the quality of the image, so lets tweak it abit.
Duplicate that base layer. Then go to Filter ---> Sharpen ---> Sharpen.
3. Now the it looks a bit too sharp, so let's duplicate that sharpened layer. Then set it to "Overlay"
4. Something is still wrong, so lets resort to my favourite technique. Create a new layer, fill it with a dark blue ((I used #0C0841)) Then put the opacity down to 50%
Your image should now look something like this:
5. I'm happy with the quality of my base picture now, so lets merge the layers together, and leave it alone.
Now to the actual icon-making:
6. Ok... So I don't remember exactly how I made that icon. But here's how the weave-like pattern was achieved:
Create a new layer
Go Edit ---> Fill ---> Select "Pattern" ---> "Texture Fill 2" ---> Weave 5.
7. Create a new layer, fill it with a gradient color of your choice ((I chose this ((it's a custom gradient made by a LJer, I'll put a link to it later)):
))8. Put the gradient layer to "color"
9. Merge the Pattern and Gradient layer. ((Name it as "Base Pattern"))
10. Duplicate this layer, put it as "Multiply"
11. Duplicate this again, put it as "Screen", 50%
12. Merge all these pattern layers.
It should looks like this:
13. Set the merged layer to Screen. It should look like this:
14. I'm sure no one wants to keep it that way. Using a soft, round rubber ((with 40% opacity)), clean off the area around her face.
K, I seriously do not know how I did the rest. I'm sorry. But it's just a bunch of warm colored gradients and a some text.
I promise my next tutorial will be better. *will remember to save the psd file*
Sorry guys *bow*