|
|
Post by Angie on Jun 20, 2005 2:47:04 GMT -5
The link is here, and I suppose someone should get a Japanese translator to translate it, I have no idea what it's really talking about either...but you should see Asaka-sensei's (the artist) way of coloring her artwork, they're beautiful!!! So please translate it and post it here! (Crediting her as well.) |
|
|
|
Post by vuvu •°♡ on Jun 20, 2005 3:49:52 GMT -5
Thanks for sharing Angie. I wish I could understand that, it's so pretty *___*
|
|
|
|
Post by GhostDetective on Jun 20, 2005 11:17:02 GMT -5
Thanks Angie! I just wish I could understand it.
|
|
|
|
Post by Meitantei Mina on Jun 20, 2005 11:19:49 GMT -5
whaaa @_@ Sry, I can't translate it.... I don't have Photoshop in Japanese so I can't tell which tool is which @_@
sry!
|
|
|
|
Post by Angie on Jun 21, 2005 4:38:53 GMT -5
Ahhh!!!  But do you understand it anyway? I suppose it doesn't matter as long as we know what it's doing, then we'll figure out what she did. |
|
|
|
Post by sherry on Jun 22, 2005 12:46:09 GMT -5
WOW!! cool site angie-neechan! but i don't know how to translate them god....i'm sooo useless >< |
|
Rika
Little Detective

Posts: 26
|
Post by Rika on Jun 22, 2005 19:48:39 GMT -5
Well, here's the first page... each bullet corresponds with the bullets, going top to bottom, left to right.
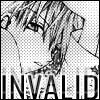
~Scanning and Editing~
Preparation: Edit > Preferences > General, Color Picker=windows
-Scan
-Use grayscale 200dpi or, since it's an avatar, less than 150dpi is okay too.
-To make the background of the original picture on the left (zoomed out by 200%) white...
-Image > Adjustments > Brightness/Contrast
-In my case, I need to I fix my outlining using the black brush and eraser to make it look like the picture on the right.
-Don't be too nitpicky since you'll eventually shrink it.
-Easier to edit with 200% zoom in.
-At this point, change from grayscale to [Image > Mode > RGB Color ]
~Saving Lines~
-[Select > All]
-[Edit > Copy]
-[Layer > New Fill Layer > Solid Color ]. Choose 'OK' on the prompt and pick white as the color.
-Ctrl + Alt while selecting the Color Fill Layer (see left)
-Shift + Alt while selecting the Color Fill Layer.
-[Edit > Paste]
-This way, the lines gets masked and appears in red (see left)
-Press Ctrl while selecting the Color Fill Layer
-Now everything except the masked lines will be selected
-[Select > Invert] to select ONLY the lines
-Without deselecting, make a new layer and name it "lines".
-With the Lines Layer selected, use the paint bucket to color it black.
-When using paint bucket, check "contiguous"
-Now's the time to color some parts of the line other colors if you desire.
-[Select > Deselect]
-Lock the Lines Layer by clicking on the lock symbol
-You can now delete the Fill Color Layer
-The background is now useless so make it completely white by using [Brightness/Contast], Brightness max, Contrast min
|
|
|
|
Post by GhostDetective on Jun 22, 2005 20:22:54 GMT -5
Thanks, Rika!!! ^__^
|
|
Rika
Little Detective
Posts: 26
|
Post by Rika on Jun 22, 2005 20:25:27 GMT -5
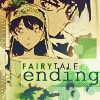
and page 2:
~Coloring In~
-When making color, follow this order (numbered in the picture)
-Make a layer called "Colors"
-Place the Colors Layer between the background and the Lines Layer
-Once you choose a color, use the pencil tool to fill in the places where the lines aren't connected.
-Make sure the color create a complete border, or otherwise when you use paint bucket, it'll leak out.
-When using paint bucket, set tolerance to about 20, anti-aliased, contiguous, and all layers all checked.
-When using paint bucket, triple-click it so it'll fill all the way into the line.
-Now, make a new layer underneath the Color Layer and fill it with some dark color, for when you're coloring in with light colors. It's easier to see where you've missed when you're using light colors if there is a dark background. When you use dark colors, you can just hide it. It's also good idea to lock this and all other layers you aren't using. To avoid coloring in the wrong layer.
-Use the pencil tool to color in where the paint bucket missed. Be careful the pen tip can also leave white spots. Avoid using the brush tool, for it can leave "mula" {I don't know what it is. I'm guessing semi-transparent colors}
-color in the bright before the dark colors.
~adding shade~
-make a new layer above the Color Layer and call it "Shade"
-make the layer mode "Multiplication". Useful for adding shade, since the colors add onto the previous layer.
-Lock the Lines Layer and Colors Layer
-On the Color Layer, use the wand to select the parts you want to color. Check off contigious so it'll select all the parts with matching color.
-After selecting, move to Shade Layer. Then, hide the dotted lines by [View > Selection Edge] Make sure not to deselect. {for my adobe photoshop, it's [View > Show > Selection Edges]}
-Now, you can just use a slightly darker than original color to add shade.
-When using paint bucket, check "all layers" so it won't color over the lines. The selection will prevent you from coloring outside the lines.
-Use the wand on the Color Layer
-Then, hide the selection lines and color on the Shade Layer. Repeat. The result is the picture on the right.
|
|
Rika
Little Detective
Posts: 26
|
Post by Rika on Jun 22, 2005 20:40:11 GMT -5
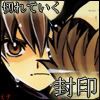
p.3 ~Touch Up~ -But right now, her lips are black and creeping me out, so let's make it red. -Unlock the Lines Layer and lock only the the invisible parts by clicking the Invisible Parts Lock {it's that first button after the word "Lock"} Now we can color on the lines without coloring in other parts. -Using this, make the lips red and add highlight. -Finally, combine the layers by [Layers > Merge Visible] {or Flatten Image, I'm not sure which one she means. I usually use Merge Visible myself, so...  } ~Shrinking It~ -It's best to use a program especially made to shrink images, but Photoshop Element 2.0 has a pretty decent one so let's use this for now. -[Image > Image Resize > Image Resolution] and shrink it down to a height of 95. {I think for Adobe Photoshop 7.0, it's just [Image > Image Resize]} -[File > Save for Web] -"Gif" and 32 colors seems sufficient -Now it's finished. Size 2.86KB -Extra: I use a image resizing program called SmaHey. There doesn't seem to be much difference, but I think if you save it for web after you shrink the image using this, it creates a smaller file. Done! You can tell I rushed at the end because my mom's telling me to make dinner. bye. |
|
|
|
Post by GhostDetective on Jun 22, 2005 21:38:56 GMT -5
Well thanks again! ^^
|
|
|
|
Post by vuvu •°♡ on Jun 23, 2005 0:19:15 GMT -5
Thank you so much Rika!! I'll try it out sometimes *huggles*
|
|
|
|
Post by Angie on Jun 23, 2005 2:16:41 GMT -5
Oh WOW! Arigatou gozaimasu, Rika-san! And arigatou Asaka-sensei for the tutorial! ^_^
|
|

 But do you understand it anyway? I suppose it doesn't matter as long as we know what it's doing, then we'll figure out what she did.

 }
}